Featured App Groups
Website Visitors:Featured App Groups:
You can create product featured app groups for your end users that are related to or fit in a specific category. For example, you can create a Sales Department featured app group containing applications that are used by that department. You can define featured apps in the StoreFront administration console by using application names or by using keywords or application categories that were defined in the Studio console.
Important: In multiple server deployments, use only one server at a time to make changes to the configuration of the server group. Ensure that the Citrix StoreFront management console is not running on any of the other servers in the deployment. Once complete, propagate your configuration changes to the server group so that the other servers in the deployment are updated.
-
On the Windows Start screen or Apps screen, locate and click the Citrix StoreFront tile.
-
Select your store, in the right side click “manage receiver for web sites” option. Once opened, select your website URL and click configure. Here, you can make changes to your website like changing background, logo, enable/disable classic experience etc.. Make sure classic experience is disabled and only then you can see “Featured App Groups” option. Click on featured app groups option.
Create a new app group. Now, you have to find a way to group your applications into this app group. We have 3 ways to do so. Keywords, application names and application category.
| Option | Description |
|---|---|
| Keywords | Define the keywords in Studio. |
| Application names |
Use the application name to define the featured app group. All applications names matching the name included herree in the Create a Featured App Group dialog screen are included in the featured app group.
StoreFront does not support wildcards in application names. The match is not case sensitive, but it does match whole words. For example, if you type Excel, StoreFront matches a published app named Microsoft Excel 2013 but typing Exc does not match anything. |
| Application category | Define the application category in Studio. |
Example:
Two featured app groups are created:
- Collaboration
- Engineering
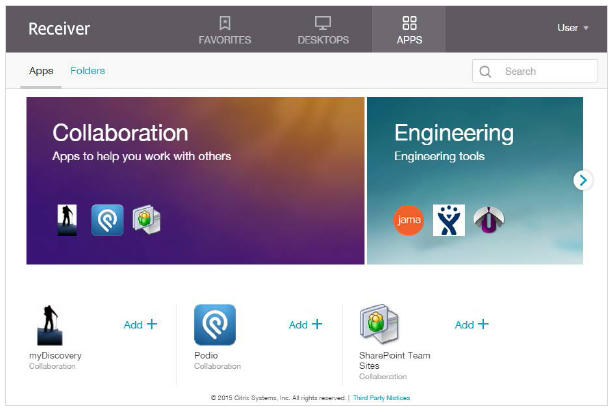
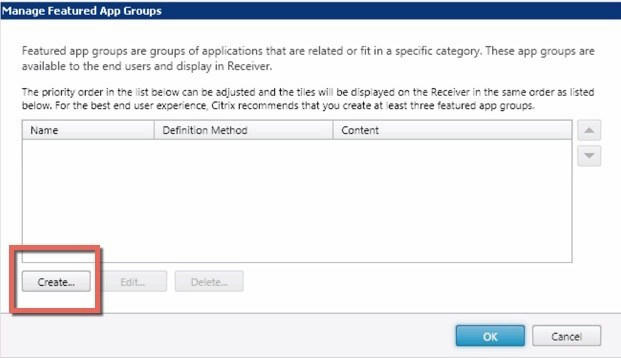
You will now see a blank box where your Featured App Group configurations can go. Click Create to begin configuring Featured App Groups.
Most of the next page is self explanatory. Input the name of the featured app, this will appear in the staff StoreFront view and then optionally a description of the application. You also have a choice of images and colour hues to pick from to match whatever scheme you have chosen for Citrix StoreFront itself.
Then finally you come to the method of application bundling. When no preference exists I would always go with the Keywords method as its nice and visable within all the consoles and is not affected by a simple application name change within Citrix XenApp or XenDesktop studio.
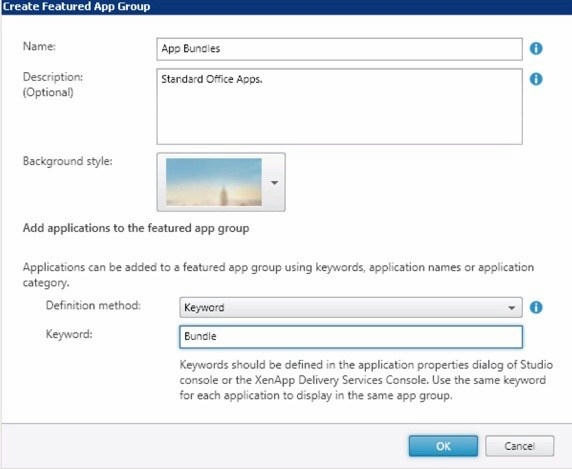
Using Keywords When Specifying a keyword simiply choose a single easy to remember and relevant word to describe the application group and enter it.
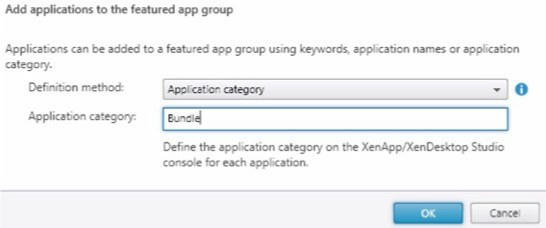
Using Catagories When specifing Application Catagories again just come up with a single word that can describe the group and enter it. You can also create a folder structure using catagories by specifing something like Applications\Bundle.
Using Application Names Utilising application names for bundles is slightly different as you need to specify each application by published application name in the list. So open up your Citrix XenApp/XenDesktop Studio and note the PUBLISHED APPLICATION name and enter those names into the list.
When using Application Names this is all the configuration that is required but you do run the risk of applications dropping out and increased troubleshooting time because of an application name change and its not quite so simple to see which bundle they belong to.
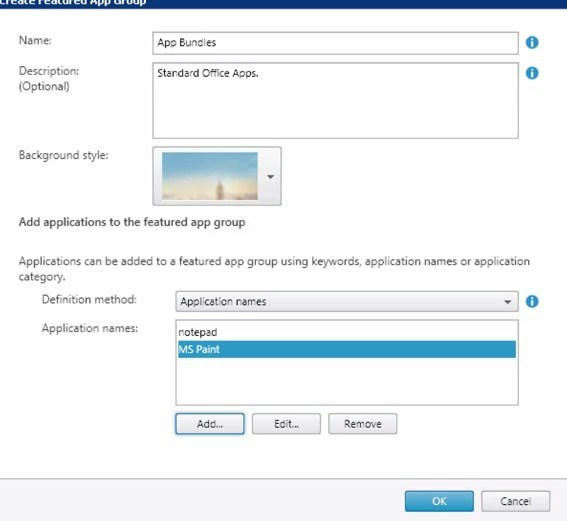
Note: Enter full name of the applications here. Entering wild-cards or first few letters of applications, doesn’t work.
Citrix XenDesktop/XenApp Configuration
Now you have StoreFront configured with the keywords and catagories its time to configured the applications and desktops.
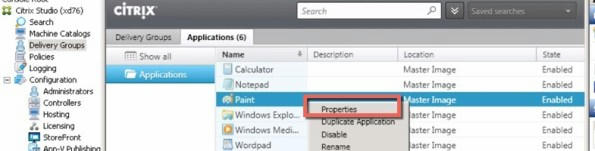
Open up Citrix Studio and then goto the Delivery Groups tab right click on a published application and choose the Properties option.
Using keywords When utilising the keywords method type the keyword in the following format ignoring the comma’s:
“Keywords:InsertKeywordHere”

Using categories When using categories click on the Delivery Tab on the left had side and enter the category in the following format, ignoring the comma’s:
“ParentFolder\InsertCatagoryHere”
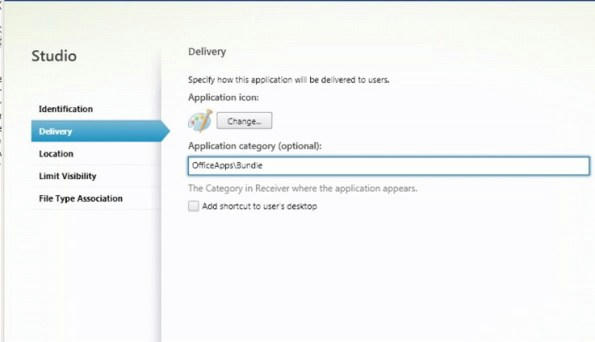
Once complete click the OK button and test that the applications appear in the correct bundle through Citrix StoreFront.
Display the Featured apps group under the “Category” view than the “All” view on storefront website
When you follow above steps and login to storefront site, you have to click on Apps tab on the top, and click on “All” view to see the app groups. Instead, with some changes on script.js file, we can make the app groups to show under Category view.
Add below code in script.js file above /* End of example customization */ line in the same file. Folder path like, C:\inetpub\wwwroot\Citrix\citrixsiteWeb\custom. Here citrixsiteweb is your citrix store name.
To display featured app groups under “All” view and under “Categories” view (both views) paste the following text in script.js under the custom folder of the web site:
CTXS.ExtensionsHead.postRedraw = function() {
if (CTXS.currentView == ‘store’ && $(’.store-toolbar .selected’).hasClass(‘folder-view’)) {
$(’.applicationBundleContainer’).show();
}
};
To remove it from “All” view and display it under “Categories” view try the following code instead:
CTXS.ExtensionsHead.postRedraw = function() {
if (CTXS.currentView == ‘store’) {
$(’.applicationBundleContainer’).toggle($(’.store-toolbar .selected’).hasClass(‘folder-view’));
}
};
So far, this is how your storefront looks, check All tab and categories tab:
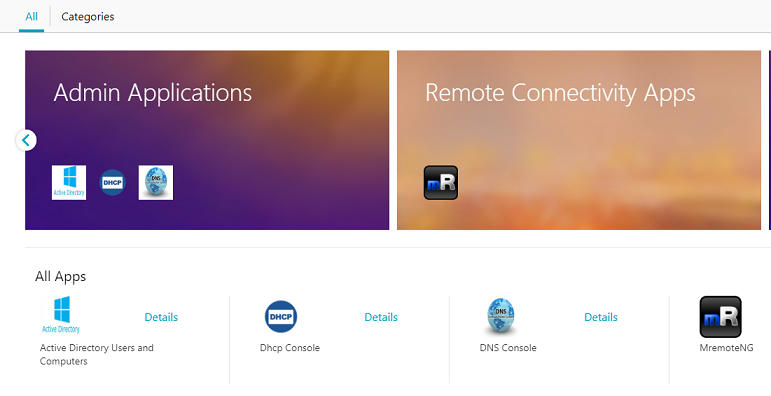

Remove All Apps section in storefront:
From above screenshot we can see “All Apps” in “All” View. To remove “All Apps” text, follow below process:
Put the following text into the “style.css” file within the “custom” folder of the web site, typically c:\inetpub\wwwroot\Citrix\StoreWeb\custom\style.css:
.store-apps-title { display: none !important; }
The changes should take effect as soon as the file is saved. Note that, it will remove only “All Apps” text, all your applications will still be there.
Featured App groups not shown in receiver:
By default featured app groups are not shown in receiver application i.e., when you download receiverconfig.cr and open it with receiver, it will add your citrix netscaler/storefront site discovery in the app so that next time you dont have to open a browser, go to netscaler link and join. If SSO is configured in storefront and receiver, you will be automatically logged into your store and all your apps would be pre-populated and ready for session in your end point device.
So, when you login to receiver, you might not see featured app groups. Follow below steps to see featured app groups in receiver.
- To show featured app groups in your receiver, you have to disable Classic Experience in Storefront Stores (green bubbles) and enabled Unified Experience. Then create new citrix policy in gpmc( I installed gpmc on citrix server so that CSE engine adds citrix polices node to gpmc console), goto computerconfiguration\policies\admin templates\citrixcompnents\citrix receiver\storefront \netscaler gateway url/storefront accounts list policy. Enter as below:
STORENAME;https://Storefront.company.com/Citrix/storeName/discovery;on;STORE DESCRIPTION
The first part, where it says STORENAME, needs to match the name of your store within StoreFront exactly. If it does, the GreenBubble theme will not show up anymore! The STORE DESCRIPTION at the end, does not really matter.
StoreName(as it is);StoreURL;on;AnyStoreDescription
This policy is explained here in detail: https://support.citrix.com/article/CTX205072. Quick screenshot of the citrix article, in case that link isnt available or not working..

Note: Open command prompt as admin on your storefront server and run iisreset command. Wait for 5 minutes. Logoff and exit receiver app. Relaunch it and you will see citrix storefront name while logging in. Login to see your featured app groups.
Want to learn more on Citrix Automations and solutions???
Subscribe to get our latest content by email.