Generate new Esx certificate
Website Visitors:Note: The below process works only for esx version till 4.X. Not for 5 and 5.X
Changing your host’s network name and SSL certificate
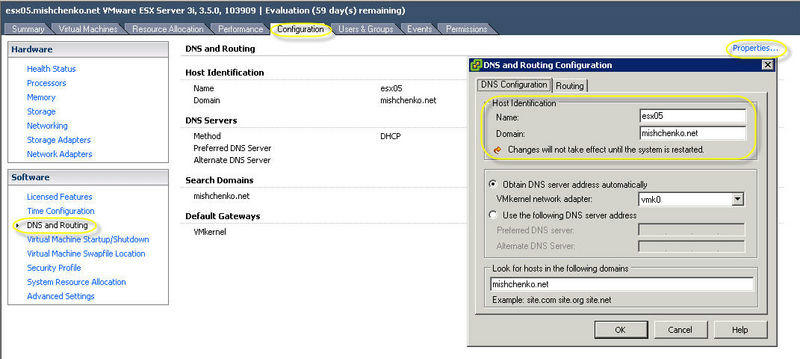
When you first install ESXi your host will be given a hostname of “localhost” and domain of “localdomain”. You can change this at the console or with the VI client.
Using the Console 1) Press
Using the VI client 1) Go to Configuration tab and select DNS and Routing 2) Click on Properties to open the DNS and Routing Configuration screen 3) Enter the name and domain for your host and click OK. 4) Right click on the host and select Reboot.

Note: both these methods will update /etc/hosts on the ESXi host. Should you manually edit this file, it is important that you do not modify the line that consists of 127.0.0.1 localhost.localdomain loclahost.
Updating the SSL Certificate for your host
Should you change your host’s hostname or domain after an install, the SSL certificate for the host will still be issued to localhost.localdomain. You can either regenerate a self-signed certificate for your ESXi host or replace the certificate from one generated by a certificate authority.
Regenerate your host’s self-signed certificate
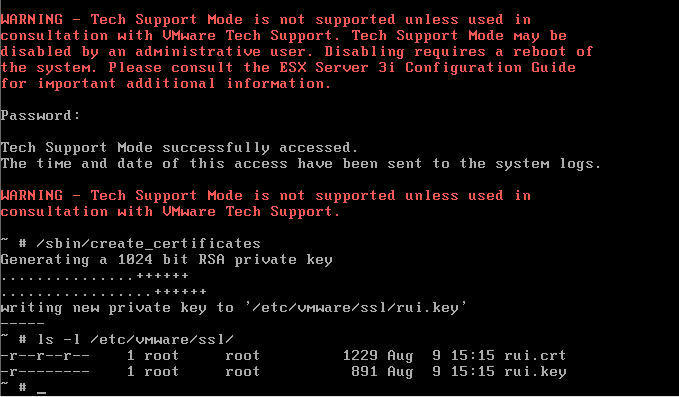
- Access the console of ESXi. If you have not done that before, follow the first three steps on this page. If you are using esx version 4.X or above, press F2 at the esx host(enter your username and password if prompted), goto Troubleshooting Options, and enable Enable Local Tech support and Enable Remote Tech Support (SSH). 2) Run the command /sbin/create_certificates (/sbin/generate-certificates.sh in esx 4.X or above) as shown in the image below. This will replace both the private key and SSL certificate for the host. These files are located in /etc/vmware/ssl/ 3) Enter the command reboot to restart the host. The certificate for the host will now reflect the hostname and domain changes that you have made.

Replace the host’s certificate with one generated by a certificate authority
The below steps used OpenSSL which can be downloaded from here and a Microsoft Windows 2003 Server Certificate Authority.
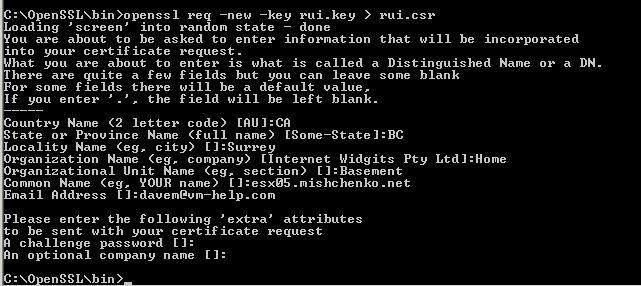
- Download and install OpenSSL from the link provided. If you’ve using Linux, your host may already have the OpenSSL package. If you are using Windows, you may also need to download the Microsoft Visual C++ 2008 Redistributable Package. 2) Generate a new private key with the command openssl genrsa 1024 > rui.key. 3) Create a new certificate request by running the command openssl req -new -key rui.key > rui.csr. A wizard will run and prompt you for information for the certificate request.

- Open the rui.csr file with a text editor and copy the contents. If using Windows, avoid using Notepad as it may insert extra characters into the copied text. 5) Open the certificate request page for your Windows 2003 CA server. This is typically http://
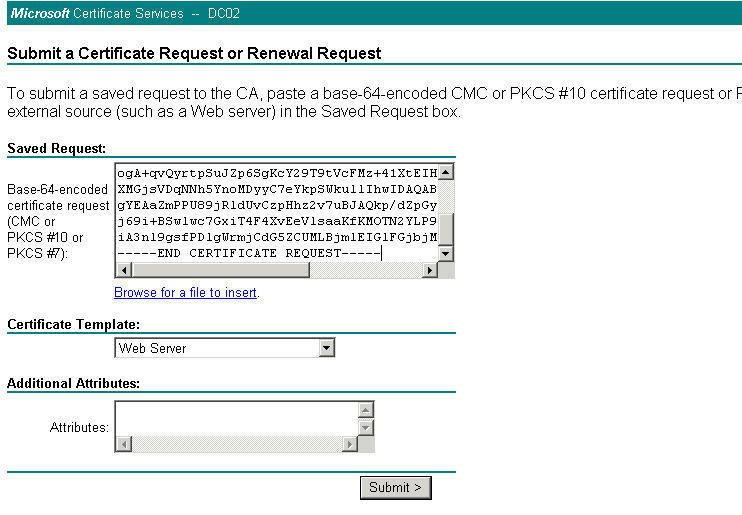
/certsrv. 6) Click on the “Request a Certificate” link followed by the “advanced certificated request” link on the Request a Certificate page. 7) Select the link “Submit a certificate request by using a base-64-encoded CMC or PKCS #10 file, or submit a renewal request by using a base-64-encoded PKCS #7 file.” 8) On the certificate request page enter the text from the rui.csr file and change the Certificate Template to Web Server. Then click Submit.

- On the certificate issued page, select the “Based 64 encoded” option and then download the certificate to your PC 10) Run the command on the certificate that you downloaded: openssl x509 -in certnew.cer -out esx.cer. 11) Now download VMware Remote CLI tools setup and install it. Now open cmd prompt and goto the remote cli folder in program files(x86)\vmware folder. Copy the private key and certificate to your ESXi host with the following RCLI commands ** vifs.pl –server esx05.mishchenko.net –put rui.key /host/ssl_key vifs.pl –server esx05.mishchenko.net –put esx.cer /host/ssl_cert**
If you are using esx 4.X or above, copy the above rui.key and esx.cer files to /etc/vmware/ssl folder.
- Restart the ESXi and verify that the certificate has been installed correctly. If there is a problem with the certificate, you may not be able to login to the host with the VI client. If that’s the case, then run**/sbin/create_certificates** at the console and reboot the host.
Note: if you try to join your ESXi host to a vCenter server and get the error: “The SSL Certificate of the remote host could not be validated” you’ll want to ensure that the root CA that issued the certificate is trusted by the vCenter host at the “Computer account” level and not just for “My user account”.
Posted in Vm-Help
Want to learn more on Citrix Automations and solutions???
Subscribe to get our latest content by email.