Access DataBase Moving/Restoring
Website Visitors:Access Data Store
While there is no built-in backup scheduler with Access, Presentation Server includes the DSMAINT BACKUP command for backing up Access Data Stores only. Citrix recommends that this command be executed daily using a scheduler script. WARNING! Do not attempt to backup Microsoft SQL Server or Oracle databases using this command.
MDB: A file with the MDB file extension is a Microsoft Access Database file.
Moving / Restoring an Access Database
Access to a valid backup or Copy of the Data Store is assumed before the following procedure is started.
Moving an Access Database
To move an Access database, complete the following procedure:
-
Copy the Data Store file named “MF20.mdb” in the %system%\Program Files\Citrix\Independent Management Architecture\ folder from the source server to the target server, which will be the new Data Store host.
-
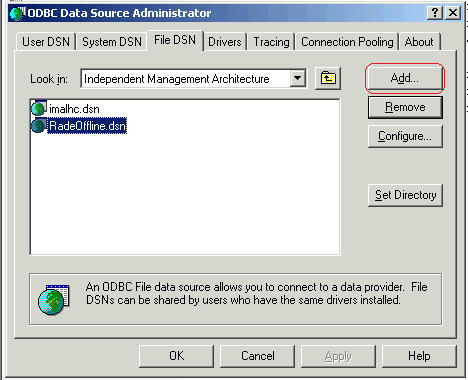
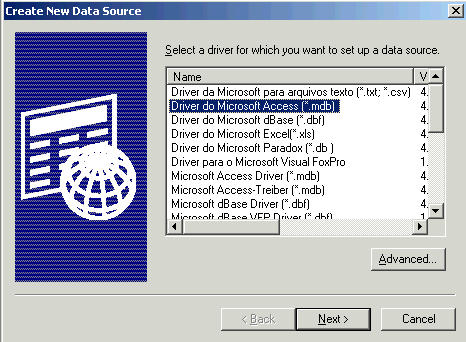
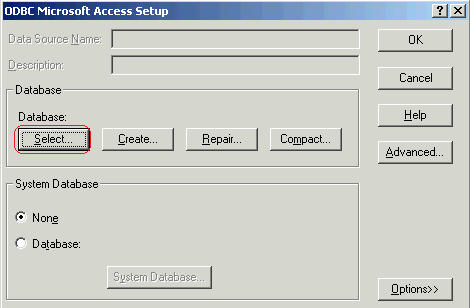
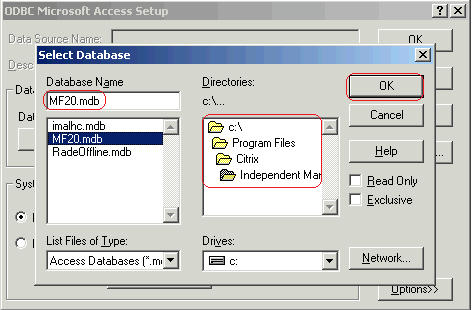
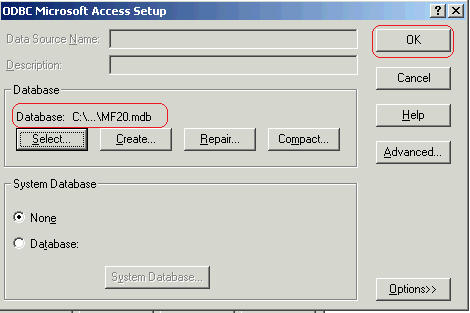
On the new host server, create a new File DSN by using the Microsoft ODBC manager pointing to the Data Store, as shown in the following screen shots:
-
Close the ODBC manager because you have created the required DSN file.
-
The next task requires you to edit the registry settings.
Caution! This fix requires you to edit the registry. Using Registry Editor incorrectly can cause serious problems that might require you to reinstall your operating system. Citrix cannot guarantee that problems resulting from the incorrect use of Registry Editor can be solved. Use Registry Editor at your own risk. Be sure to back up the registry before you edit it._
-
Run the Registry Editor and change the value of the following registry key to ImaAccess.dll HKEY_LOCAL_MACHINE\SOFTWARE\Citrix\IMA\DatabaseDriver
-
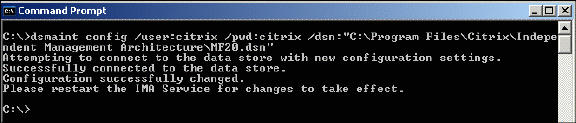
Open a command prompt and run the following command to configure IMA and use the new DSN file. dsmaint config
-
Below is a sample for your reference: dsmaint config /user:citrix /pwd:citrix /dsn:.
Note: You can drag and drop the DSN file into the command prompt to avoid typing the wrong path.
-
Run the following command from the command prompt to stop the IMA Service and recreate the Local Host: dsmaint recreatelhc
-
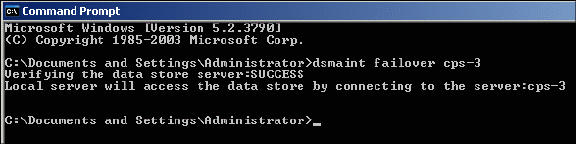
On all the remaining servers in the farm, run the following command, where cps-3 is the name of the new host server(Which we have built now). dsmaint failover cps-3
Restoring an Access DatabaseIt is assumed that the following tasks are completed before starting the procedure to restore an Access database:
- You have rebuilt or reinstalled XenApp to recover from a failure.
- You have a working XenApp server up and running with IMA started.
- You have access to a backup copy of the old Access Data Base (MF20.mdb) created by theDSMAINT BACKUP command or some other method.
To restore an Access database, complete the following procedure:
-
Stop the IMA Service and copy the existing MF20.mdb file to a safe location. Note: You will be replacing this file with your backup MF20.mdb.
-
Copy the Data Store file named “MF20.mdb” from the backup source to the target server and save it in the %system%\Program Files\Citrix\Independent Management Architecture\ folder. Note: The IMA Service must be stopped before starting the next task.
-
Open a command prompt and run the dsmaint config command to configure IMA and use the existing MF20.dsn file. Following is a sample of the preceding command:
dsmaint config /user:citrix /pwd:citrix /dsn:.
Note: You can drag and drop the DSN file into the command prompt to avoid typing the wrong path.

4. Run the following command from the command prompt to recreate the Local Host cache and any other servers in the farm so they are aware of the new information: dsmaint recreatelhc
Note: Do not forget to stop IMA before you run the preceding command.
Want to learn more on Citrix Automations and solutions???
Subscribe to get our latest content by email.