Configure NetScaler High Availability
Website Visitors:Configure Netscaler High Availability:
Configuring NetScaler in high availability mode allows your users to access their apps and desktops in case primary NetScaler fails for some reason. High availability checks for primary NetScaler availability. In case if it is not able to contact the primary NetScaler it immediately starts failover process and secondary NetScaler becomes primary and primary becomes secondary in high availability pair. When this happens all existing connections will be dropped and reconnected again. Users will see connecting to your app session reliability notification on their screen. Once secondary NetScaler becomes primary NetScaler, users are connected to their apps and desktops again.
When configuring NetScaler high availability you have the following options.
You can configure a NetScaler appliance in a high availability pair to stay as the primary or the secondary appliance. To do so, you can use the set ha node –hastatus <option> command on the appropriate node of the high availability pair.
You can use the following options to set the ha node –hastatus command:
- STAYPRIMARY: This option forces the NetScaler appliance to stay in the primary mode. However, if two appliances are primary at the same time, it results in an IP conflict and split brain condition, when makes both the appliances to process the traffic.
- STAYSECONDARY: This option forces the NetScaler appliance to stay in the secondary mode.
- ENABLED: This is the default option. This option enables the NetScaler appliance of the high availability pair to fail over based on the high availability events.
- DISABLED: This option disables the high availability engine.
Set Up ADC High Availability
Note: Secure Shell (SSH) connection is used to execute the commands within this article.
Complete the following procedure to setup High Availability pair on ADC appliance:
-
Log in to the primary ADC appliance and run the following command from CLI:
set ha node -hastatus STAYPRIMARY -
Log in to the secondary ADC appliance and run the following command from CLI:
set ha node -hastatus STAYSECONDARY -
Run the following command on both primary and secondary ADC appliance to disable any network interface that is not connected to the network:
disable interface interface_num -
From the primary ADC appliance run the following command from CLI to specify the ID and the NSIP address of the secondary appliance:
add HA node <id> <ipAddress>Note:The maximum node ID for appliances in a high availability setup is 64. It can be any number. For example, you can use the number 2 for the secondary appliance. The number 64 does not indicate that you can have 64 nodes in a high availability setup. It is just a variable value. The high availability setup is always created from two appliances.
-
Log into the secondary ADC appliance and run the following command in the CLI to specify the ID and the NSIP address of the primary appliance:
add HA node <id> <ipAddress> -
The RpcNode password must be set on both the appliances. The passwords must be the same on each appliance. The primary appliance must be aware of the secondary RpcNode password and the secondary appliance must be aware of the primary RpcNode password. Note: The ADC nsroot password must also be the same on each node. The RpcNode password does not have to be the same as the nsroot password.On the primary ADC Gateway appliance, run the following command from the command line interface:
set ns rpcnode <ipAddress> -password <string> The IP address must be the IP address of the primary appliance. For more information on the ns rpcNode command refer to Citrix Documentation. -
Run the same command and specify the IP address of the secondary appliance. Use the same password.
-
Repeat the action and specify both RpcNode passwords with same commands on the secondary ADC Gateway appliance.
-
After you specify the RpcNode password on the primary and the secondary appliances, run the following command to check the setting:
show ns rpcnode -
After the node and rpcnode password on both appliances are set up correctly, verify the node status with following command:
show ha node If the RpcNode password is set correctly on both appliances, then the status of the second appliance appears correctly. Else, you can get UNKNOWN status results of the remote node.a. Node ID: 0
IP: x.x.x.x.x (ns)
Node State: UP
Master State: Primary
INC State: DISABLED
Sync State: ENABLED
Propagation: ENABLED
Enabled Interfaces : 1/1
Disabled Interfaces : 0/1 1/3 1/2 1/4
HA MON ON Interfaces : 1/1
Interfaces on which heartbeats are not seen :
SSL Card Status: UP
Hello Interval: 200 msecs
Dead Interval: 3 secs
b. Node ID: 2
IP: x.x.x.x.x
Node State: UP
Master State: Secondary
INC State: DISABLED
Sync State: SUCCESS
Propagation: ENABLED
Enabled Interfaces : 1/1
Disabled Interfaces : 0/1 1/3 1/2 1/4
HA MON ON Interfaces : 1/1
Interfaces on which heartbeats are not seen :
SSL Card Status: UP
- Use the sync HA files command on the Primary appliance to force file
synchronization from the primary appliance to the secondary appliance.
This command synchronizes all the SSL Certificates, SSL CRL lists, and
VPN bookmarks. The primary appliance is considered authoritative and
files are copied from the primary to the secondary appliance overwriting
all differences.
**sync ha files all ** - To enable HA setup run the following command on both the primary and secondary ADC appliances:
set ha node -hastatus ENABLED - In case you added a new appliance to an already existing appliance to form an HA pair, then go to the new appliance and remove the duplicate default route (0.0.0.0/0). Pairing adds the default route defined on the already existing appliance, but does not remove the default route configured on the new appliance.
- After all files are synchronized and the communication between the
secondary and primary appliance is working properly, test the failover
scenario. The following command fully simulates a failover situation
where the role of primary and secondary appliance switch between the
appliances, the secondary appliance takes full control of all dedicated
traffic and becomes the primary appliance.
force HA failover

NetScaler HA - When the high availability failover works successfully and you would like to return the primary appliance to its original state, use the command again to force the failover back.
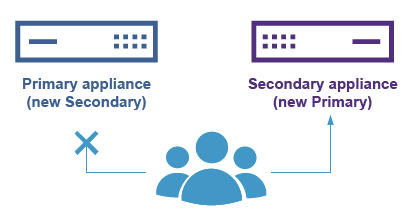
Stay Secondary Appliance
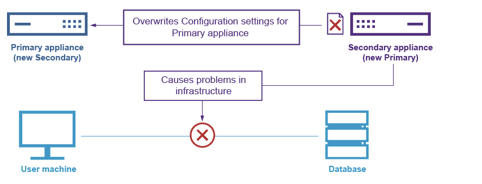
The secondary appliance automatically becomes the primary appliance when the primary appliance is restarted and the connection between them is interrupted. The heartbeat will fail. You can have the secondary node stay as the secondary appliance when the primary appliance will not be accessible as the secondary appliance.
This could be very helpful in some specific maintenance scenarios, when the secondary appliance fails and must be replaced. For example, if the secondary appliance is replaced, then the high availability setup can be set up but the configuration cannot be synchronized and the primary appliance fails or cannot be accessible for any reason. The secondary appliance becomes active without the proper configuration and cause problems in the infrastructure. In some scenarios it could overwrite the configuration of the previous primary appliance if the communication between the secondary and primary appliances is established again.
Run the following command from the command line interface on the secondary appliance to keep it as the secondary:
set node -hastatus STAYSECONDARY
To remove the STAYSECONDARY setting, run the following command:
set node -hastatus ENABLE
For More information Checkout https://support.citrix.com/article/CTX116748 or https://www.citrixguru.com/2015/09/14/lab-part-6-configure-netscaler-11-high-availability-ha-pair/
Note for test lab or Home Lab users: When you use High Availability, you need 2 netscalers. Download the vpx file from citrix.com website and import it twice for 2 netscalers. Goto the NetScaler vm settings and generate Mac address for both the NetScaler vms. Use that Mac address and get two license files. If you want to use same license file for two NetScaler vms, you have to use same Mac address. In that case, high availability doesnt work. Even though you run all the commands correctly, one of the nodes will show as UNKNOWN in NetScaler high availability page. So, for poc or lab environment, if you want to test NetScaler HA, get two license files or don’t apply any license at all. Leave it as is, and configure HA.
Remove an Active NetScaler Secondary Pair Member
-
Log on to both NetScalers and run the following command to confirm which node is Primary and which node is Secondary:
show ha node -
Log on to the Primary NetScaler, backup the configurations on the Primary node, and copy the files off of the NetScaler prior to the changes.
The steps are as follows:These files are located under “/var /ns_sys_backup/” directory.
- Save the NetScaler running configurations to memory:
save ns config - Create the full backup file package:
create system backup -level full - Create the basic backup file package.
create system backup -level basic
- Save the NetScaler running configurations to memory:
-
After all backup files have been generated, be sure to copy them off of the device before proceeding.
From a windows terminal, open a Command Prompt and copy the backup files off of the NetScaler and onto your local hard drive. This can be done using the following command:
pscp <username>@<NSIP>:<Target file source> <Target file destination>For example:
pscp nsroot@10.125.245.78:/var/ns_sys_backup/backup_basic_10.125.245.78_2016_09_14_15_08.tgz c:\nsbackup\backup_basic_10.125.245.78_2016_09_14_15_08.tgzWhen prompted, enter the password for the specified administrator account, then hit “Enter”. Repeat these steps until all backup bundles are copied to the local PC before proceeding. -
SSH into the Secondary NetScaler, and set the unit to the “STAYSECONDARY” status. This will force the unit to not attempt to assume Primary role in the event of detected failure during the swap. Confirm that you are connected to the Secondary NetScaler before executing this step
set ha node –haStatus <state>
set ha node –haStatus STAYSECONDARY -
Once the Secondary NetScaler’s “Node State” successfully displays “STAYSECONDARY”, switch to the Primary NetScaler and delete the secondary node and run the following command:
save ns configWhile logged into the Primary NetScaler, run the following commands
- Run the following command to identify which numerical value represents the Secondary HA node:
show ha node - Run the following command to remove the Secondary NetScaler from the Primary HA pair;
rm ha node <node ID> - Run the following command to save the configuration:
save ns config - - With the Secondary NetScaler now removed, shutdown, disconnect, and remove the Secondary NetScaler from the network.
Note: Be sure to label all connections before disconnecting.
- Run the following command to identify which numerical value represents the Secondary HA node:
General Notes on what is RPC Node:
To communicate with other Citrix ADC appliances, each appliance requires knowledge of the other appliances, including how to authenticate on Citrix ADC appliance. RPC nodes are internal system entities used for system-to-system communication of configuration and session information. One RPC node exists on each Citrix ADC appliance and stores information, such as the IP addresses of the other Citrix ADC appliance and the passwords used for authentication. The Citrix ADC appliance that contacts the other Citrix ADC appliance checks the password within the RPC node. Make sure to use same rpcnode password on both the vms.
Change an RPC node password | Citrix ADC 13.1
RPC is for communication between two netscalers. We can secure this communication by using secure RPC.
Enable/Disable Secure RPC:
By default, communication between the NetScaler appliances are not secure. This includes the propagation and synchronization communications between the NetScaler appliances in a high availability pair and the Metric Exchange Protocol (MEP) propagation between the appliances involved in the Global Server Load Balancing setup.
The RPC page of the network node contains information about how to communicate with other NetScaler appliances on the network. This includes the password used to authenticate on each instance.
Instructions
To secure the communication between NetScaler appliances on a network, complete the following procedure from the command line interface of an appliance:
-
Run the following command to verify if the RPC nodes are already secured:
show rpcNode1)IPAddress: 10.16.1.100 Password: 8a7b474124957776a0cd31b862cbe4d72b5cbd59868a136d4bdeb56cf03b28 Retry: 1 SrcIP: 10.16.1.100 Secure: OFF
-
If the value for Secure parameter is “OFF” as highlighted in bold face in the preceding output, then run the following command to make the RPC node secure:
set rpcnode <IP_Address> -secure YES -
Run the following command to verify if the RPC node is secured:
show rpcnode1)IPAddress: 10.16.1.100 Password: 8a7b474124957776a0cd31b862cbe4d72b5cbd59868a136d4bdeb56cf03b28 Retry: 1 SrcIP: 10.16.1.100 Secure: ON
Set rpcNode to Off if you want to disable secure rpc. In case of any HA synchronization issues, after you have upgraded netscaler instances, disable secure RPC and check.
The following ports must be open between each ADC appliance in the pair:
- UDP 3003 – Heartbeat exchange communication.
- TCP 3008 – Secure high availability configuration synchronization.
- TCP 3009 – Secure command propogation and MEP (Metric Exchange Protocol).
- TCP 3010 – High availability configuration synchronization.
- TCP 3011 – Command propogation and MEP (Metric Exchange Protocol).
- SSH 22 – Used by rsync during file synchronization between primary and secondary appliance.
Want to learn more on Citrix Automations and solutions???
Subscribe to get our latest content by email.